Online Chat
Office Hours: 24/7
Start Chat

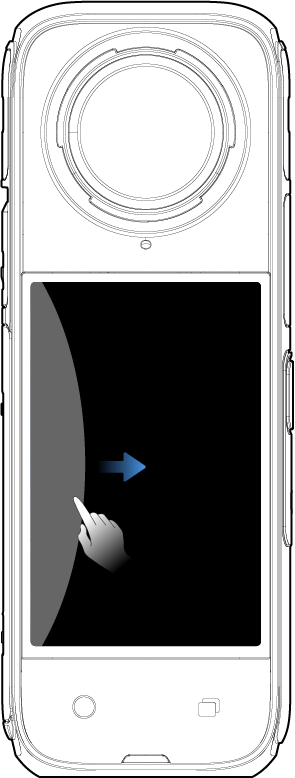
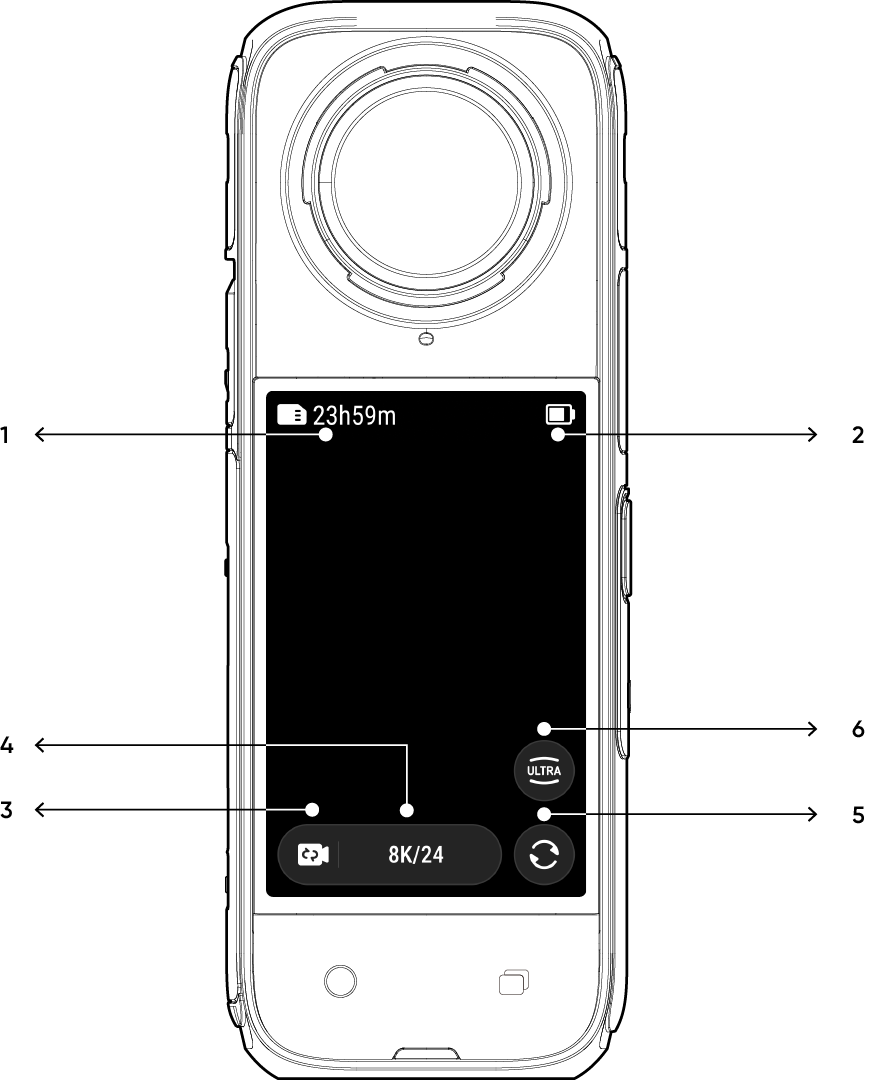
When the camera is powered on, the touchscreen displays the camera's home page and information about the shooting mode, battery level, and storage capacity. By swiping or tapping the screen, you can achieve the following:
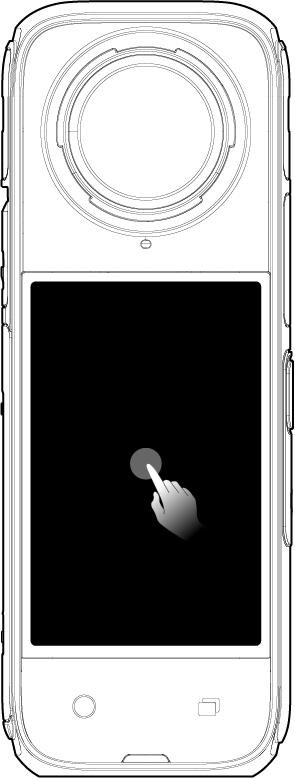 |
Tap the screen Hide/show information on the touchscreen. |
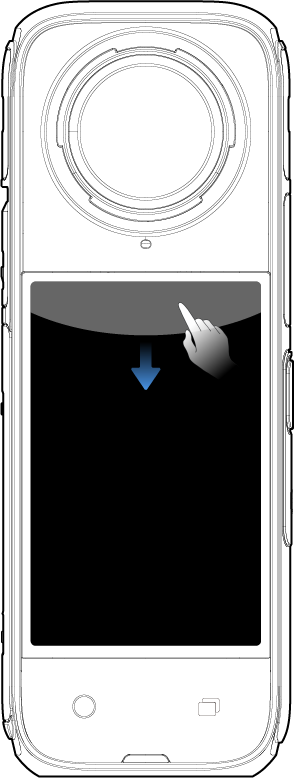 |
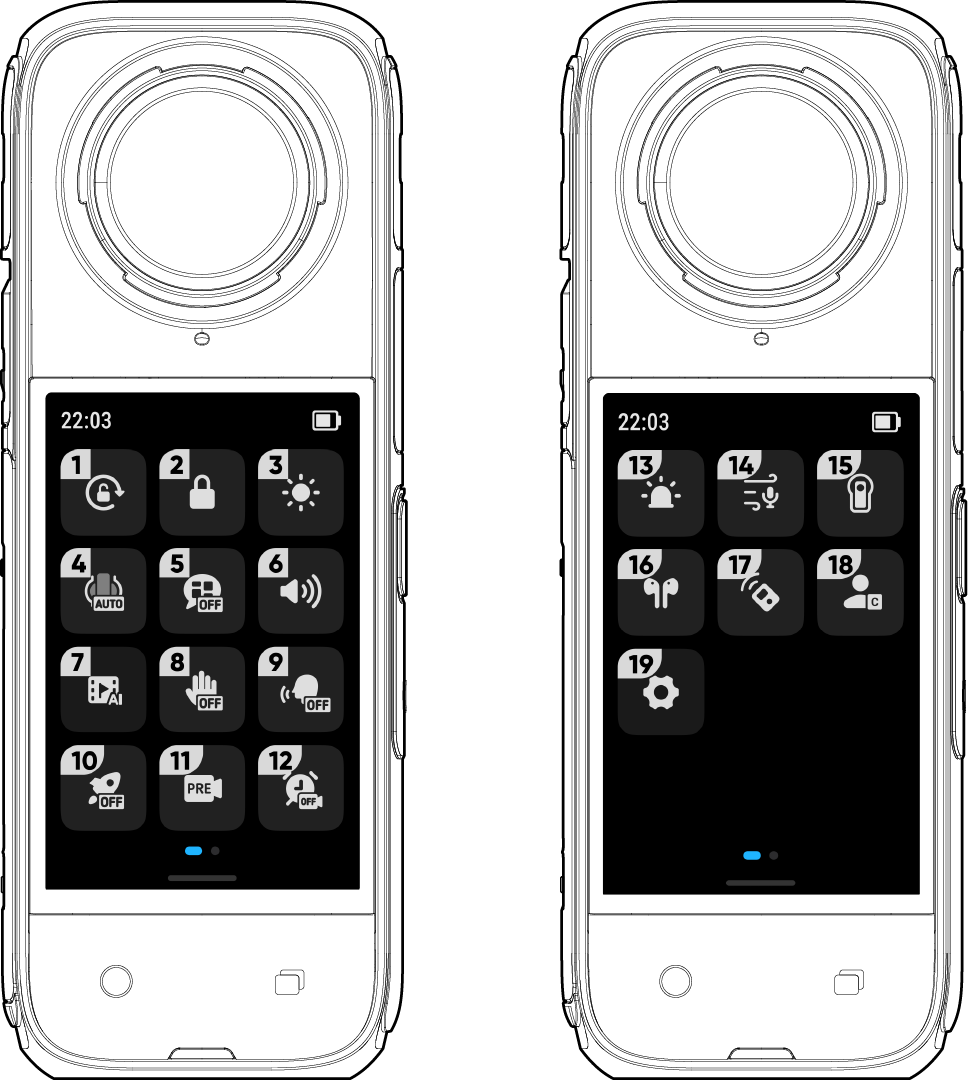
Swipe down from the top View Shortcut Menu. |
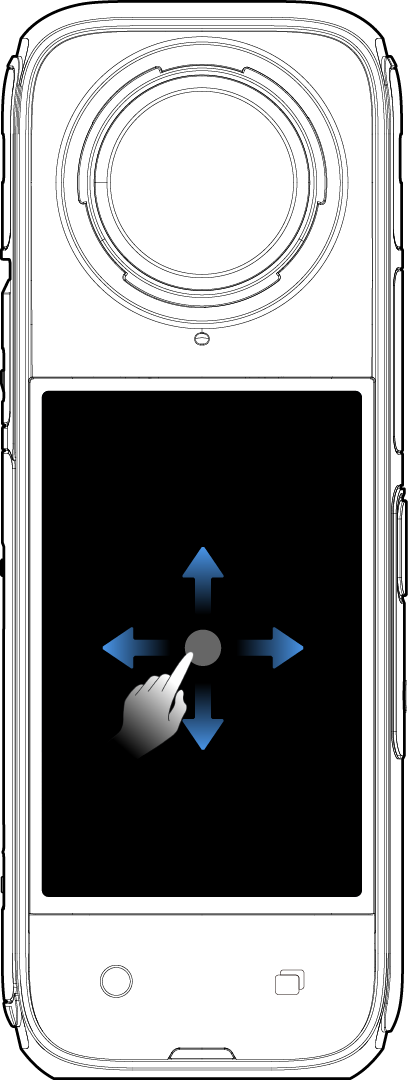 |
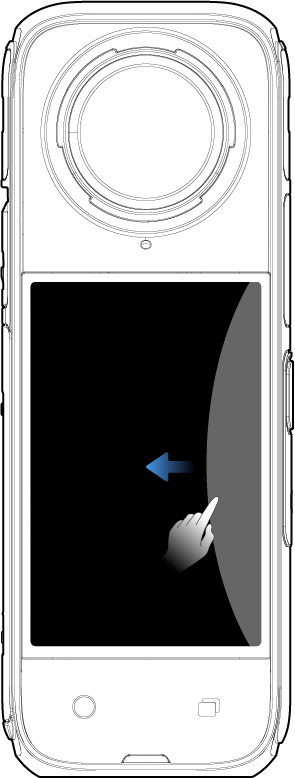
Swipe left to right or up and down from the center Adjust the shooting angle in 360 Mode. |
 |
Swipe from the left Enter the album page. |
 |
Swipe from the right Enter shooting parameter settings. |
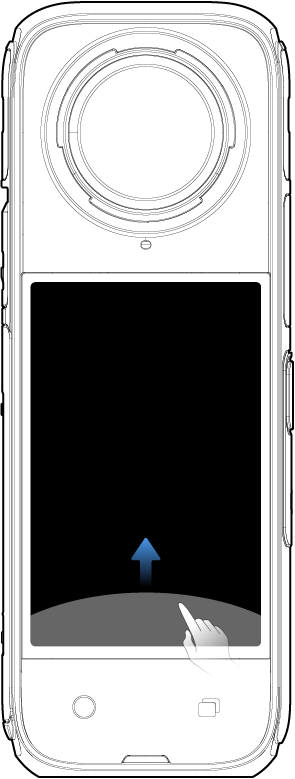 |
Swipe up from the bottom More shooting parameter settings. |
Tap the shooting mode icon and swipe or swipe left and right from the center of the screen to select a different shooting mode.
| Shooting Mode | Description |
|---|---|
| Video | Record 360° videos up to 8K30fps. |
| Active HDR | Record stabilized high dynamic range video. Recommended to shoot in clear daytime conditions with good lighting. |
| Timelapse | Suitable for shooting static timelapse videos. |
| TimeShift | Take a hyperlapse (sped-up) video while moving. |
| Bullet Time | Slow-motion video with 360º overhead rotation. |
| Loop Recording | Record continuously and save only the last fixed-length segment. |
| Starlapse | Shoot and store multiple photos and automatically combine Starlapse effects. |
| Burst Photos | Take multiple photos in a short space of time. |
| Interval | The camera automatically takes continuous photos at a specific time interval. |
| HDR Photo | For high dynamic range photos. Please keep the camera still while shooting. |
| Photo | Take a single photo. |
| Shooting Mode | Description |
|---|---|
| Video | Record wide-angle videos from one lens up to 4K60fps. |
| Me Mode | Record 4K30fps or 2.7K120fps wide-angle videos with the Invisible Selfie Stick effect. It keeps you in the center without any reframing. |
| Loop Recording | Record continuously and save only the last fixed-length segment. |
| FreeFrame Video | Apply FlowState Stabilization and Horizon Lock with adjustable aspect ratio in post via the app or Studio. |
| Photo | Take a single photo. |
Swipe down on the touchscreen to view the Shortcut Menu.
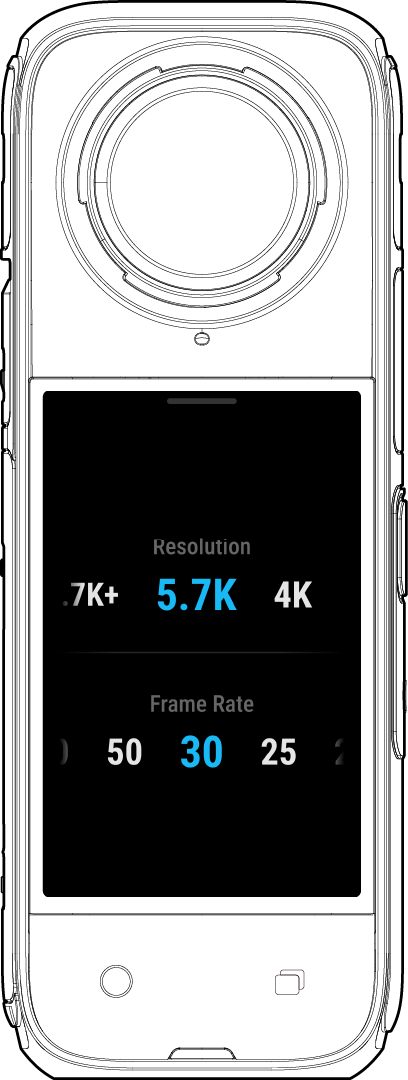
Swipe up from the bottom of the touchscreen to view shooting specification settings.
| Shooting Mode | Parameters |
|---|---|
| Video | Resolution, Frame Rate |
| Active HDR | Resolution, Frame Rate |
| Timelapse | Resolution, Frame Rate, Interval |
| TimeShift | Resolution, Frame Rate, Speed |
| Bullet Time | Resolution, Frame Rate |
| Loop Recording | Resolution, Frame Rate, Loop Duration |
| Starlapse | Type, Resolution, Duration, Timer |
| Burst Photos | Resolution, Timer, Burst number/duration |
| Interval | Resolution, Duration, Interval |
| HDR Photo | Resolution, Timer |
| Photo | Resolution, Timer |
| Shooting Mode | Parameters |
|---|---|
| Video | Ratio, Resolution, Frame Rate |
| Me Mode | Ratio, Resolution, Frame Rate |
| Loop Recording | Ratio, Resolution, Frame Rate, Loop Duration |
| FreeFrame Video | Ratio, Resolution, Frame Rate, Horizon Lock |
| Photo | Ratio, Resolution, Timer |
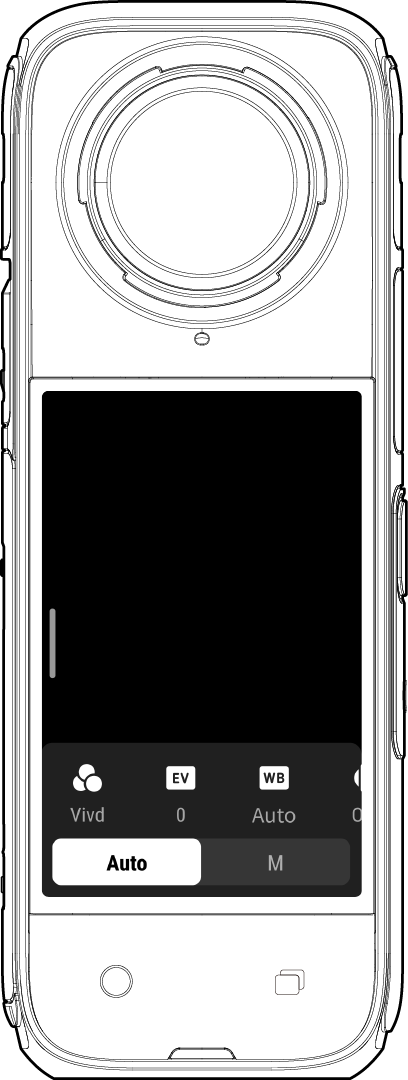
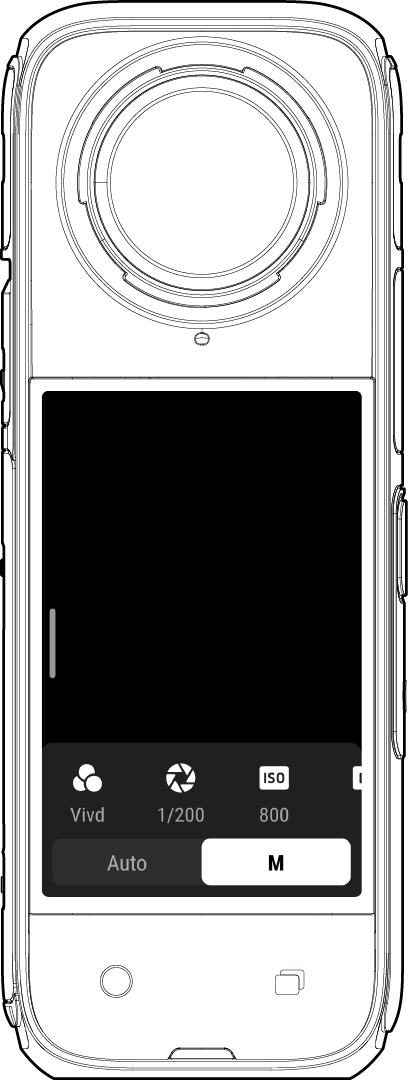
Swipe left from the right edge of the touchscreen to see the shooting parameter settings.
| Shooting Mode | Parameters |
|---|---|
| Shutter Speed | Controls the time it takes for light to enter the camera. The faster the shutter speed, the clearer the image. Make this higher for dynamic shots and lower for low light conditions. |
| Sensitivity (ISO) | Reflects how sensitive the sensor is to light. A higher sensitivity means the camera can capture more light for a brighter image. |
| Exposure Compensation Value (EV) | In Auto Mode, you can adjust the EV to help with overexposure or underexposure. |
| White Balance (WB) | Removes unrealistic colors and tones so colors are accurately captured in the image. A higher white balance produces warmer tones, lower results in cooler tones. |
| Low Light Stabilization | Improves motion blur and stabilization in low light environments. In extreme environments, the image will be darker and may have some flickering. |
| Filters | Add different color tones and effects. |
| Metering Mode | Face Priority prioritizes the face for brightness. Matrix ensures accurate exposure of the whole image. |
| Balanced Exposure | The screen will automatically equalize the exposure according to the environment. |
360 Mode and Single-Lens Mode support different parameters in different shooting modes.
360 Mode:
| Shooting Mode | Parameters | Parameters |
|---|---|---|
| Auto | Manual | |
| Video | Filters, EV, Low Light Stabilization, WB, Balanced Exposure | Filters, Shutter, ISO, WB |
| Active HDR | WB | WB |
| Timelapse | Filters, EV, Low Light Stabilization, WB, Balanced Exposure | Filters, Shutter, ISO, WB |
| TimeShift | Filters, EV, Low Light Stabilization, WB, Balanced Exposure | Filters, Shutter, ISO, WB |
| Bullet Time | Filters, EV, WB | Filters, WB |
| Loop Recording | Filters, EV, Low Light Stabilization, WB, Balanced Exposure | Format, Shutter, ISO, WB |
| Starlapse | EV, WB, Balanced Exposure | Shutter, ISO, WB |
| Burst Photos | Format, EV, WB, Balanced Exposure | Format, Shutter, ISO, WB |
| Interval | Format, EV, WB, Balanced Exposure | Format, Shutter, ISO, WB |
| HDR Photo | Format, WB | WB |
| Photo | Format, EV, WB, Balanced Exposure | Format, Shutter, ISO, WB |
Single-Lens Mode:
| Shooting Mode | Parameters | Parameters |
|---|---|---|
| Auto | Manual | |
| Video | Filters, EV, Metering Mode, Low Light Stabilization, WB | Filters, Shutter, ISO, WB |
| Me Mode | Filters, EV, Metering Mode, Low Light Stabilization, WB | Filters, Shutter, ISO, WB |
| Loop Recording | Filters, EV, Metering Mode, Low Light Stabilization, WB | Filters, Shutter, ISO, WB |
| FreeFrame Video | Filters, EV, Metering Mode, Low Light Stabilization, WB | Filters, Shutter, ISO, WB |
| Photo | Format, EV, Metering Mode, WB | Format, Shutter, ISO, WB |
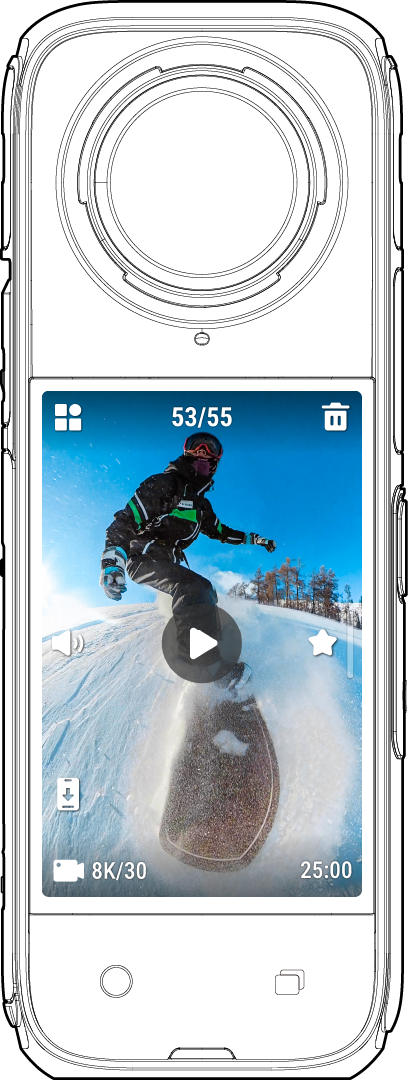
Swipe right from the left of the touchscreen to enter the Album page.
.svg)

